music

Activity: Mix it Up!

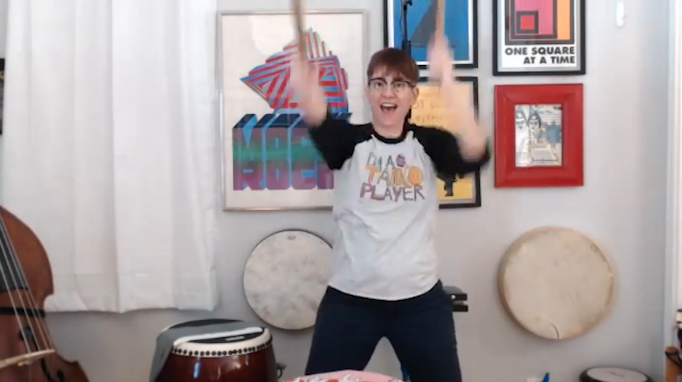
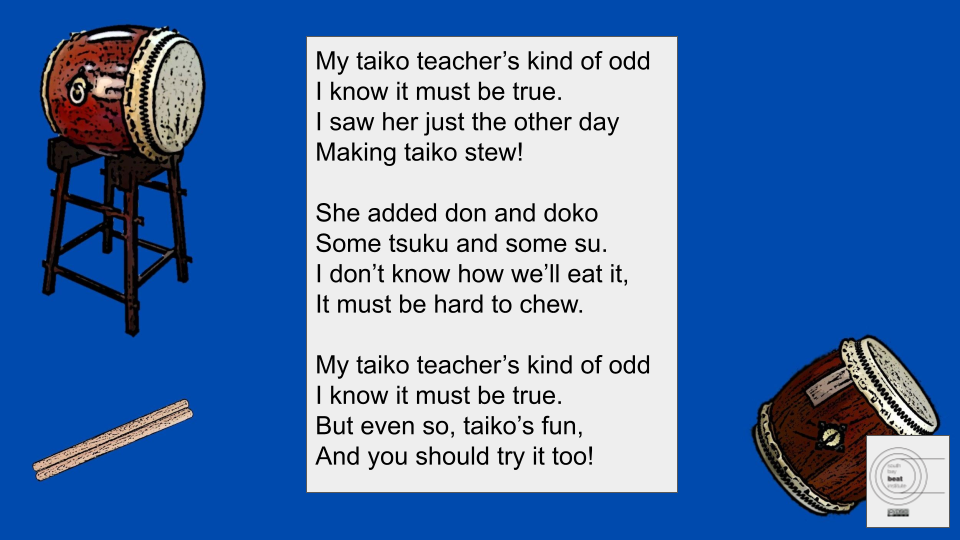
Whatever ages you’re teaching, you can help your students build confidence with creating rhythms if you scaffold well. I wrote the short poem “My Taiko Teacher” to help the students practice pulse in a 4th/5th grade virtual program I just finished. (The students LOVED the poem - never underestimate the power of making fun of yourself!)

MyTaikoTeacher_FullPoem.png

The poem works great for practicing pulse. You can also use it in the following activity to help students take the first steps in creating their own rhythm patterns:

  • Provide this link to your students (I put it in the chat for my virtual program; if you’re working in person, work with the classroom teacher to see how students can access a computer during your class. Alternately, you could ask the classroom teacher to have students print the slide out and bring it to class with you, and then change beats with markers.)

    • This is a “Make a Copy” link that will prompt students to each make their own copy of the slide that they can then work with. If you’re not familiar with this technique, I highly recommend Katie Wardrobe’s webinar Google Slides for Music Teachers. Actually, I highly recommend Katie Wardrobe, period. I’ve learned SO MUCH listening to her.

  • If your students aren’t familiar with Google Slides, share your screen and show them how to click inside the green boxes and edit the text.

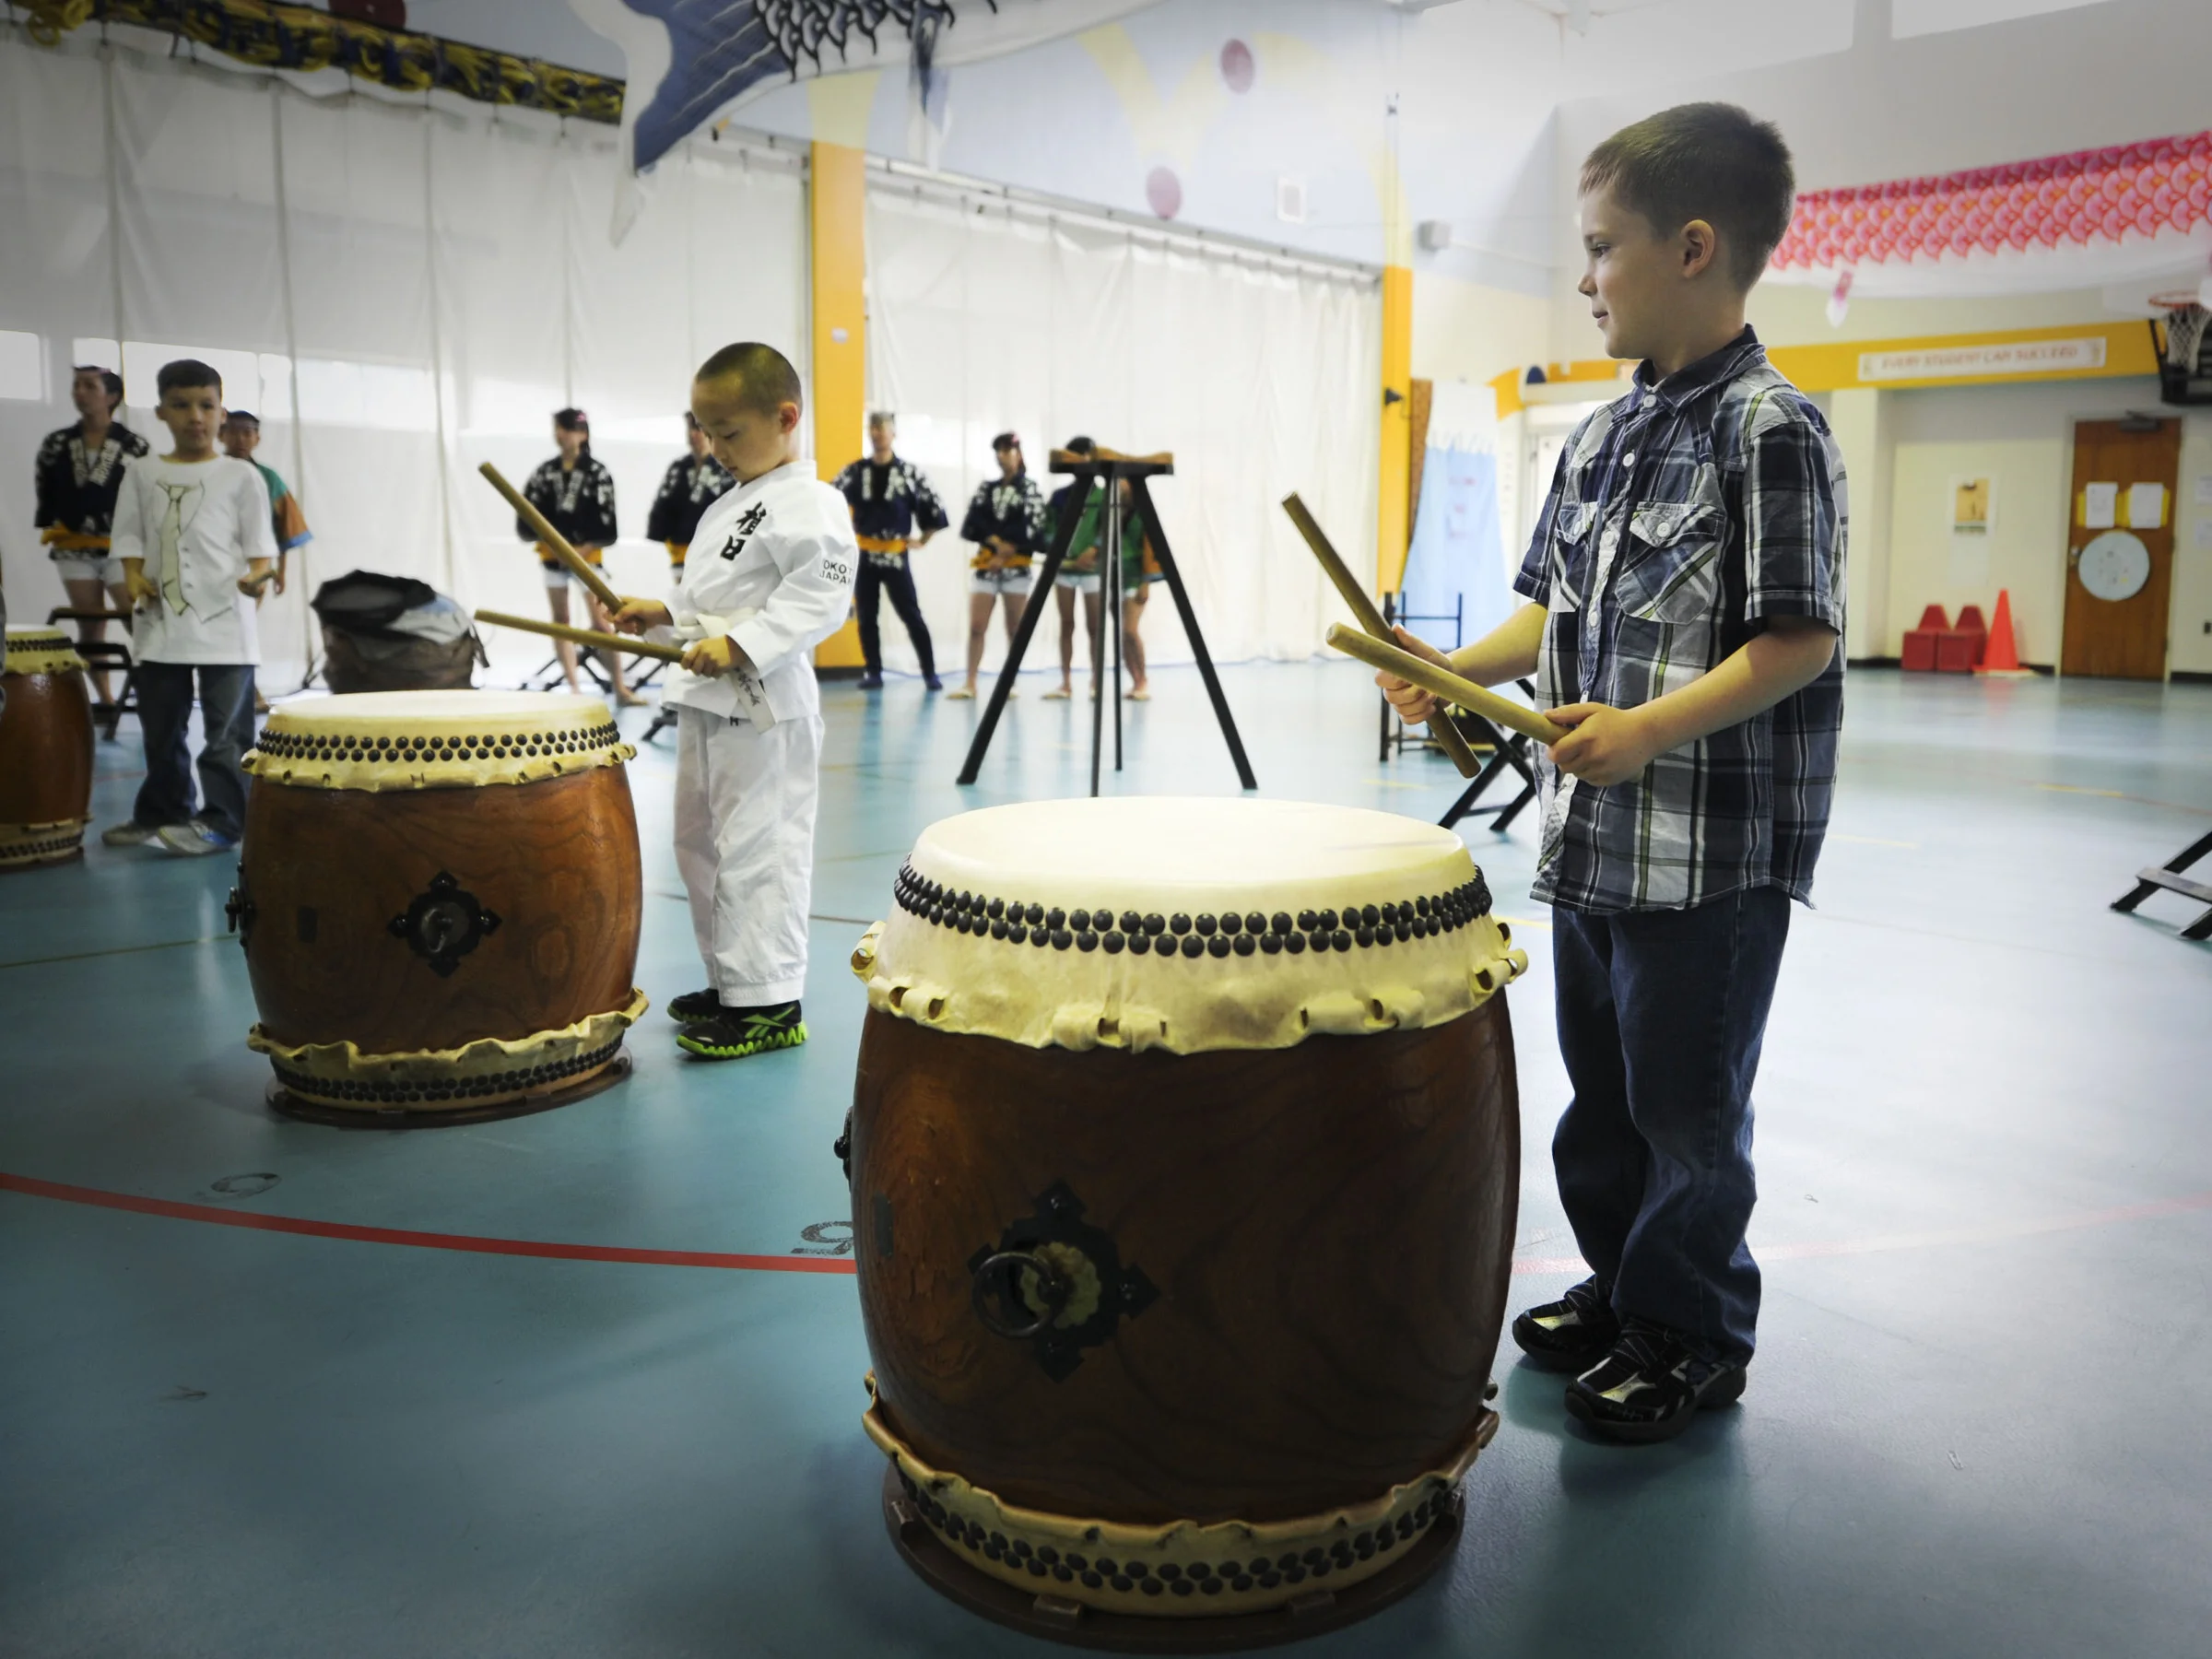
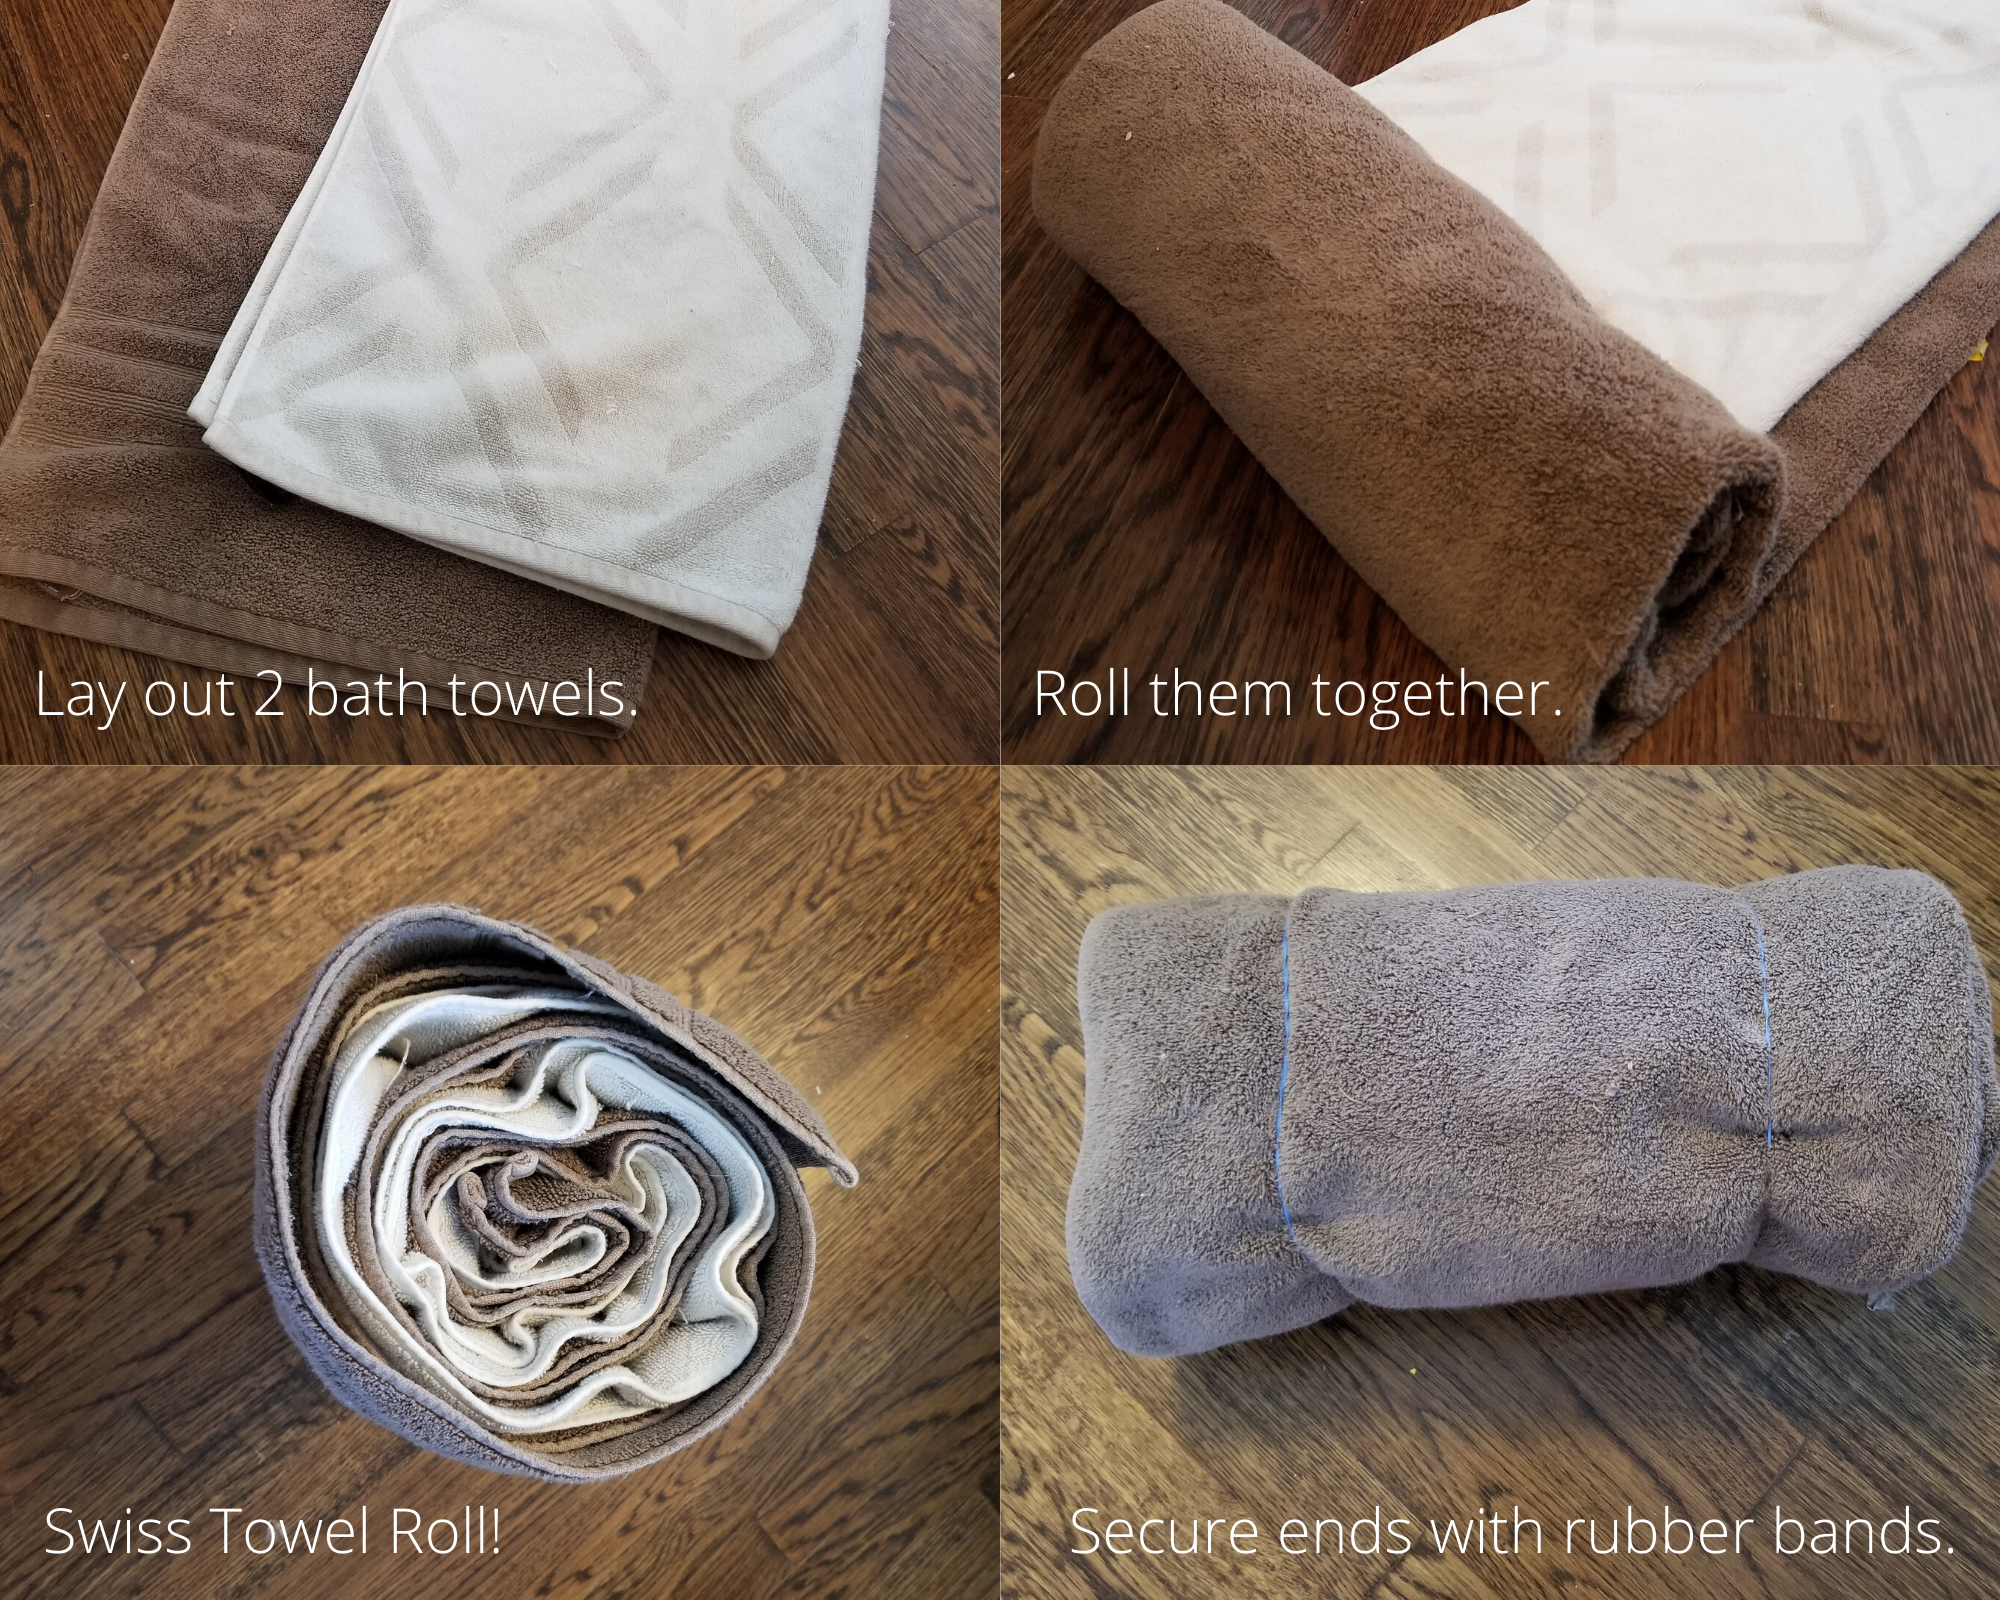
    • For my residency, I didn’t cover ka and kara because the students were all using rolled up towels as their playing surface . This is great for lowering barriers to participation, but not great for ka and kara.

  • Give them a few seconds to change a note, and then have everyone play. If you’ve covered the idea of playing with a jiuchi, then play a ji, but if you haven’t, then play the poem with them without any changes. 

  • Go through this process several more times until they’ve changed 4-8 of the notes.


You probably noticed that the poem makes liberal use of pickup beats. If your students are more advanced, point that out and talk about it. If they aren’t, then just tell them there’s a reason that “My” and “I” are in parentheses and leave it at that. Of course, explain if they ask, but my students didn’t.

Let me know if you try this with any of your students and how it goes. Happy teaching!

Activity: Fast Find!

Sometimes you need a quick activity to refocus a group, or to build a sense of fun into a new class. This simple activity for kids and playful adults works well on Zoom; I’ve never tried it in a live class (we created it for our virtual classes) but I’m pretty sure it will work there, too. It supports some skill development (focus and beat internalization) but mostly, it’s fun and active and helps students build a playful frame of mind, which is great for learning. And sometimes you just need a brain break!

Click to watch a demo of Fast Find!

Click to watch a demo of Fast Find!

This video shows us doing Fast Find! in one of our recent Kids Taiko Zooms. Start by playing 8 don in unison with the class. Rather than saying the kuchishoka, count the don (say “1 2 3 4 5 6 7 8” rather than “don don don don don don don don”). Play this count several times in a row until everyone has internalized the pulse. (I only do this once in the video because we’ve played the game before, so we only needed a quick review before jumping in.)  Next comes the game. First, say an object (a window, a door, something soft, etc.) then count everyone in. Students play the first note with you. During 2-7 YOU keep playing, saying the numbers out loud, and the students have to find and touch whatever object you’ve named. Their goal is to get back to their drums in time to play the 8th and final don with you. Since Kristin and I teach our online classes together, she plays the game with the students so they have an example to follow.

We usually play 4-5 rounds in our classes. It always gets energy up and puts a smile on people’s faces, which is no small thing in Month 11 of a global pandemic. If you have a particularly genki class, you’ll want to remind them that safety is more important than making getting back to their drums by the 8th don. 

Let me know if you try this game! I’d especially love to hear if you try it in an in-person class. Happy teaching!

RomeRandomBlogGraphics (1).png

Kuchishoka Tool: Taiko Tiles

Most beginners age 12 and up quickly grasp kuchishoka. Grasping is step one; building fluency comes next. Along with the kuchishoka deck, I use Taiko Tiles to support that development. (Here’s the post on my kuchishoka deck and how to use it in the classroom.)

taiko-tiles-phrases.png

Both of these instructional aids are a huge help to visual learners. The western notation supports students familiar with that system and introduces it to kids who aren’t familiar with it. Having students arrange short patterns with the Tiles and post them on the board for everyone to play is a low-risk introduction to composition. If you’re following my preferred method for teaching new songs, the Taiko Tiles can be a Step 6 (posting them to reinforce what students just learned).  

Here’s a pdf of a basic Tile set. I print them out on colored paper, putting note families on similar colors (don and doko on dark blue and light blue paper, for example) and have them laminated for durability. Masking tape works great for posting, and if you laminate them, they’ll last for several years. (Most print shops can laminate, if you don’t have access to a laminator.)

If you use this resource, let me know! I first worked with these in Tucson, and Kristin and I have fine-honed them in the last few years. I’d love to hear about any further adaptations people come up with. Happy teaching!

Landing your first residency

TullyTeach.jpg

In-school residencies can be a welcome source of revenue for a group or an individual teaching artist. Like any line of work, it can be hard to break into, but once you do, it becomes easier to get more of it. Here are some tips:

  1. Develop a one-pager.

    This doc should explain how your program will benefit the students and the school receiving the residency. Keep it to one page and make sure there’s lots of “air” on the page. Bulleted lists and 2-3 paragraphs with spaces in between them are good; a solid wall of text is not. The Americans for the Arts has a TON of research on the benefits of arts education and is a good starting point. This one-pager should guide the conversation in meetings with teachers and principals, and you should leave a copy with them at the end of the meeting.


  2. Leverage your existing network.

    When I was a taiko newbie, my group performed at an elementary school where a member’s granddaughter was a student. Her teacher LOVED the performance. The following year, I approached that teacher about a residency and she was immediately an advocate. She convinced the rest of the teachers at her grade level and the principal, and we did a residency there the following year.

    I landed my first residency after moving to the Bay Area when a taiko friend mentioned that another friend had just passed on a residency. The first friend connected me with the person booking the residency and they booked me right away because I came to them through a recommendation.

    The lesson here: be social. Make friends. Hang out with them. Go to events. Let people in your orbit know you’re looking for residency work.


  3. Find your own funding.

    Schools rarely have the money to fully fund an artist-in-residence program. Many states have a statewide arts agency that offers partial grants to help cover the cost, but schools don’t always know about this resource. Do your research beforehand, and bring at least one grant opportunity to the school to help cover your fee. Some states require that the school be the applicant, so it’s very helpful to the school if you can provide grant language they’ll need to put together a proposal.


  4. Residencies attract more residencies.

    Just like performances attract more performances, completing even one successful residency is a strong indicator that more will come your way. Kids talk to parents, parents talk to neighbors and co-workers, teachers talk to peers at other schools. This word of mouth is likely to bring you more work.


Don’t give up if it takes months or even a year or two to land your first residency - more will almost certainly follow. Of course, the stronger your program, the easier it will be to find additional work. I can help - contact me for support in creating a great in-school residency. Happy teaching!


A power song for advanced beginners: Tenryu

Looking for a power song to teach your students? Tenryu, a recent composition of ours, might fit the bill. It’s written out in kuchishoka and western notation here, and the video includes a full run and some tips from people who are learning it.

Tenryu is a great example of how much harder it can be to learn a song from transcribed kuchishoka, and I strongly recommend the video as a learning tool. A huge thank you to Taiko SOBA for being in the video! (The terms stage right and stage left are critical to connecting the notation with the video. If you’re not familiar with those terms, they’re explained here.)

Tenryu translates as “Sky Dragon” and the idea behind the song is that the entire group is a single dragon. It’s meant to convey the freedom, connection, and power generated when we channel our ki -- ALL of it-- into a collective effort.

Some notes on the song:

  • Tenryu isn’t complex rhythmically. The challenge is in playing it powerfully without tensing up.

  • Most sections start with a pick-up.

  • The patterns and tempo generate the mood of the song, rather than players hitting as hard as they can.

  • In the transcribed kuchishoka, the bold text in section C is there to make the pattern (replacing dokonko with dogodogo) easier to see.

  • Section D is challenging on two levels. It’s the only part of the piece where the chu and odaiko play different parts, and the odaiko part can be tricky to lock. There’s also an “extra” dogodogo at the end of this section. It’s unexpected for the listener, but it drives the song into the final sections.

Notes on the video:

  • The odaiko part is being played by 4 players in the back.

  • Taiko SOBA vibrated the entire room with this rendition (go SOBA!). Nevertheless, this is a great version to learn from.

As usual, we’re releasing this under Creative Commons Attribution-NonCommercial-ShareAlike  which means you’re welcome to remix, tweak, and build upon Tenryu, as long as you credit us and license any new creations under identical terms.

If you have questions while learning or teaching Tenryu, drop me a line. If you perform it, please post a video let me know. Happy teaching!


Introducing a jiuchi: 4th and 5th grade

blog pic mel ost ji.jpg

The hardest part about teaching by yourself is holding the jiuchi. If you play it, students will try to copy you; if you don’t play it, then the group as a whole will have trouble staying on the same pulse.

Below is my method for introducing a jiuchi to 4th and 5th graders (here’s the post about doing this with younger students). The alphabet/ostinato activity is from my original Orff training, and I developed the taiko extension.

This activity takes 20-30 minutes, longer if you have to do Step 9. The three parts are written out here for reference.

  1. Teach the alphabet body percussion exercise described here.

  2. Point out that you have two elements going: a melody and an ostinato.
    NOTE: “melody” isn’t exactly the right word, since clapping isn’t pitched, but it’s close, and it’s a word they’re likely to recognize, so I go with it.

  3. Have students do the alphabet body percussion with the ostinato again.

  4. There is a 99.9999% chance that they will speed up. Point out that they did. (If they didn’t, congratulate them on that, and say that groups usually do.)

  5. Define tempo. Discuss how faster isn’t always better, and that what you’re usually going for in music is a steady tempo and a shared pulse.

  6. Explain that in taiko, we use a jiuchi to help keep a steady tempo and shared pulse and that this rhythm pattern usually happens on a shime.

  7. Demonstrate the pulse for the body percussion exercise they just did.

  8. Have them do the exercise again using body percussion while you play a jiuchi on a shime.

  9. If students haven’t yet played drums in your class yet, spend some time describing how to play the drum safely, respectfully, and musically.

  10. Have students transfer the body percussion to the drums as outlined in the pdf.

In my experience most 4th and 5th graders do well with this method. A few get confused, but they usually figure it out by watching their classmates. Notice, there’s more talking/explaining with students this age than with younger kids.

Let me know if you try this method and how it works for you. Happy teaching!


Introducing a jiuchi: K-3

A big challenge when teaching by yourself is the jiuchi. If you play it, many students will copy you rather than playing their part; if you don’t play it, then the group as a whole will have trouble staying on the same pulse.

I’ve developed two methods for introducing the jiuchi, teaching students how to pay attention to it without copying it exactly. The method varies from K-3 to 4th/5th; here’s how I do it with the little ones.

  1. Introduce a Play 4 Step 4 pattern.

  2. Gradually build in more Play 4 Step 4 patterns until they can do 4-5 in a row.

  3. Have them to do Play 4 Step 4 the whole way around (i.e., each student plays every drum and winds up back at their original drum).

  4. Introduce bachi (covered in a later post).

  5. Repeat steps 1-3 with bachi.

  6. Gradually introduce jiuchi.

Basically, I play in unison with them for several rounds of a simple pattern they’re comfortable with, and then phase in the jiuchi. When they stop, I ask them if I was playing the same thing as them the whole time. Most of them have noticed that I wasn’t (but stayed with their pattern even when I switched).

This takes place in Week 2, and I return to it in Week 4. With those two introductions, students usually have the understanding they need to listen to and be on beat with the jiuchi without copying it exactly.

Send me an email if you have questions, and happy teaching!


The Critical First Day: Taiko Fundamentals Gr 1-3

The first taiko fundamental I address is an awareness of pulse and the ability to play from that awareness. This skill (also known as a sense of rhythm) CAN be taught! I’ve found it works best when you scaffold it using voices and bodies before using drums, no matter what age you’re working with. The ability to follow a pulse is woven throughout most Music Ed standards, so spending time on it is a great way to teach taiko and helps kids meet state standards.

To build this skill in 1st-3rd grade, I echo teach a simple introduction chant that includes an experiential understanding of pulse. The steps are below and illustrated in the video. The whole thing takes 10-20 minutes, depending on how many kids get a turn in Step 5.

  1. Preview the full chant while finger tapping on the pulse.

  2. Echo teach the chant. Keep the finger taps.

  3. Demonstrate call and answer at the end of the chant.

  4. Choose a few kids to do their name as a call and answer at the end of the chant.

  5. Have as many kids do this as time allows.

  6. Explain how the finger taps show pulse, and how tapping pulse isn’t the same as tapping every note. (NOTE: the audio quality on the video drops here - my mic died - so you might have to turn it up to hear me.)

Since the kids are copying me exactly while I teach the chant, they’re showing the pulse with finger taps the whole time. With this experiential understanding, they’re ready for the term “pulse” when I cover it in Step 6. That, by the way, is an essential element of the Orff method: build experiential understanding before introducing terminology.

This great activity is from my original Orff training and I’ve used it for years. It’s written out here in western notation. Along with experiential understanding of pulse, it also addresses foundational skills for improvisation and call and answer. Lastly, it helps kids practice copying, which is a key skill in my classes for this age.

Students won’t build a perfect understanding of pulse this first day. Include some pulse practice in every session, though, and they’ll really be getting it by the end of your classes.

Questions? Let me know! Until next time, happy teaching!


The Critical First Day: Establishing Expectations, Pt 2.

One size does not fit all! You can't treat 4th and 5th graders the same way you treat K-3 students. This post continues the discussion I started last week on setting your students (and yourself) up for a successful residency.

With 5th graders, I ask them about their classroom or school rules, and then say that those rules apply in the taiko classroom too. The video on the right shows me holding this conversation with a 5th grade class I started working with recently. Bonus, it also includes the system I use for randomly selecting kids to participate. More detail in a future post, but it’s much more effective than asking for volunteers to answer questions! (4th and 5th graders tend to know what number they are in their classroom.)

For consequences in 5th grade, I just calmly name rule breaking if I see it. (“You’re talking to your neighbor while I’m talking. That’s disrespectful.”) I’ve had good luck with students changing behavior when I do that. Mind you, they’re not happy for a few minutes, but they almost always come around and act more appropriately in the future. This doesn’t require any particular introduction on the First Day, just do it when it happens. Take note: you erode student confidence and trust in you if you show frustration at moments like this, so work on your poker face.

With unruly classes, I’ll use a Check/X system to give them a visual reference for how they’re doing. They get a green check on the board when they’re meeting behavioral expectations, and a red X when they don’t. It’s basically the same as the happy face/sad face system I use with K-3, but adapted for older kids.

Fourth grade is a wild card. Less mature classes thrive under the chant/happy/sad face system, and more mature classes will roll their eyes at it. I usually start with the 5th grade strategy in 4th grade. If that doesn’t work, I switch to to the K-3 strategy.

Middle school is an entirely different ball game. Email me if you teach middle school and want some tips. Until then, happy teaching!


The Critical First Day: Establishing Expectations

I started two residencies this week, and it reminded me how “make or break” the First Day is. A good First Day lays the foundation for a successful residency; a bad one truly sets you back. In honor of my newest residencies, I’m starting a series of posts about building a First Day that will set you up for a successful taiko class.

Three critical things happen on the first day. This post talks about #1: the students learn your behavioral expectations. I talk about K-3 strategies here and will talk about higher grades next time.

The winning strategy with all grades is to set clear expectations and be consistent and immediate with consequences AND with reinforcement when kids do well. With K-3 students, I teach a rules chant on the first day. The video shows me introducing these rules as a chant to a new 2nd grade class.  

(Note, these rules work for me, but if they don’t feel like a fit for you, Google “music classroom rules” for literally thousands of examples.)

I introduce the chant on the First Day, and then it becomes our focusing activity for the rest of the residency. At my schools, students walk from their regular classroom to the room where I’m teaching. Never underestimate how completely a walk across the school campus can derail a kid! They absolutely need an activity like this to focus when they get to you. These kids will say the chant every week at the beginning of class, and they’ll have it perfect by Week 4.

Rules aren’t effective unless there’s a consequence for breaking and positive reinforcement for following. For my K-3 classes, I draw a happy face and a sad face on the whiteboard. When the majority of the class follows a rule (i.e., everyone listens the whole time I’m giving directions) I put a check under the happy face. When a rule is broken, I put a check under the sad face. At the end of class, I make a big deal of having the happy face checks cancel out the sad face checks. I introduce this system in the latter part of this video. Kids this age really respond to this approach!

Lots of classroom teachers have some kind of behavior reward system in their classrooms. (For example, they put marbles in jar when the class shows good behavior. When the jar is full, the class gets a pizza party or something). See if the teachers you’re working with have a system like this and if they’re willing to tie behavior in taiko class to their existing system (i.e., they put a marble in the jar if the class has more happy face checks than sad face checks in a day, and take one out if the reverse if true).  

That’s it! Next time I’ll talk about establishing expectations with older students. Although my focus is on in-school taiko programs, this approach can be easily adapted for out-of-school programs. Contact me if you want some suggestions for that. Until then, happy teaching!


Taiko Games: Read My Mind

Read Mind 1.JPG

I first encountered this game in my Orff training and adapted it for taiko. It’s an excellent way to review songs, but can also be adapted to give students low-risk practice in making up 8-beat rhythm patterns. It’s great for students in grades 1-5 (roughly ages 6-11). Adults and playful high schoolers can have fun with it too, but it’s not a good fit for the middle school set (roughly ages 12-14).

The set-up

Choose a piece of a song you’re working on in class, but don’t tell the students what it is. For example, if your students are learning Matsuri, choose a line from that song (i.e., don don don kara ka ka).

Ask the students if any of them can read minds. (A few will raise their hands.) Tell them you’re thinking of a part of a taiko song and you want to see if they can read your mind. For beginning or younger students (1st-3rd grade), tell them which song. For more advanced or older students (4th grade and older), don’t tell them which song. For all ages, DO tell them how many beats long the part is.

How to play

  1. Arrange the taiko in a circle so all students can see each other. Include a shime.

  2. Teacher begins playing a jiuchi on the shime.The students begin playing phrases, trying to guess what phrase the Teacher is thinking of.

  3. When a student plays the phrase the Teacher is thinking of, Teacher says “1 person is reading my mind!”

  4. The other students then use deductive reasoning to figure out who’s “reading the Teacher’s mind.”

  5. As more and more kids figure out the correct pattern, the Teacher keeps giving updates. “Now 2 people are reading my mind! Now 3!”

The game continues until everyone is “reading the Teacher’s mind.”

Variations

  1. Instead of a phrase from a song, think of an original 8-beat rhythm pattern and see if any of the students can figure it out. (Sometimes I start a round with no particular pattern in mind. When a kid plays one I like, I decide that’s the one.)

  2. Let a student lead this activity. Advanced/older students can try playing shime while they have their mind read.

  3. If your kids need to get some wiggles out, play this as a movement game. You play a song or rhythmically regular pattern on the taiko and think of a SIMPLE movement that could be used to show the pulse of that pattern. (Tapping head, patting knees, jumping jacks, the floss, etc.) The class tries to figure out that movement.

Try this in your class next time you’re working on a new song and the students need a brain break. It gives them a rest AND reinforces the patterns. Happy teaching!


Another Song for Beginners: Sanae Swing

Many beginning students have trouble feeling a swing jiuchi. This is especially true for new players who don’t have music or dance training before coming to taiko. I created Sanae Swing as an entry-level piece to help these players build facility with swing ji and with creating and playing solos.

Structurally, the song is very simple. It’s just an Intro/Outro pattern, a tag, and places for players to plug in solos (or duets, if they’re not comfortable soloing yet). The kuchishoka deck is a great tool for students who are new to creating solos. I highly recommend printing one (or more) and using it (them)!

The video above shows our community class playing a short arrangement of Sanae Swing. They opted for duets rather than solos and used the kuchishoka decks to create them. The kuchishoka and western notation are here. If you teach this song, please post video and let me know! I’d love to see where people go with it.

Happy teaching!


Introducing New Songs: Method 1

There are a lot of ways to teach new songs to your students. Kristin and I have different “go-to” methods we rely on. This week I’m writing about mine; in a future post, she’ll introduce hers.

My method is adapted from my Orff training. Under the Orff method, students learn music much the way humans learn language - through listening, repeating, getting it wrong at first, learning from mistakes, and repeating the process until they’ve got it. It’s active learning that, over the long haul, builds real ownership of the material and a capacity for creative risk-taking. It’s a great way to teach kids and adults and it’s a great way to teach taiko.

The steps are below. I usually stop between steps and take questions, or if I see people struggling in a way that indicates lack of understanding. I don’t usually stop for struggling that reflects the normal effort of memorizing a new pattern.

The video on the right shows all of the steps. It’s just under 3 minutes long, but the full process takes 10-20 minutes, depending on how long a phrase you’re teaching and how quickly your class learns.

1. Introduce the full phrase while tapping on your body.

Use whatever phrasing is natural in the song you’re teaching. In the video, it’s 4 measures, which I find to be a good length. Tap your shoulders and legs to show where the pulse of the phrase is.

In the video, I’m teaching the tag from Sanae Swing, one of my beginner songs. Note that I tell the students what I’m going to do before I do it. This kind of signposting is helpful for most types of learners.

2. Break the full phrase into smaller sections and echo teach them.

Get students copying you on the body tapping. Then say “First me” and say a small section of the phrase. After you finish, say “Now you.” Students say that same section back to you. Keep tapping the entire time.

They will not get it right the first time - they’re not supposed to! They’re supposed to do their best. Don’t stop when they make mistakes. Just say “First me” again, repeat the section, and say “Now you” for them to echo again. Keep this up until about ⅔ of them are getting it right about ⅔ of the time (the ⅔ ⅔ rule).

3. Keep adding small sections until you’ve introduced the entire phrase.

Once you hit the ⅔ ⅔ mark on the first section, add the second. This time, DON’T signpost. Just do it. In the video, I add a third section because the class had gotten to ⅔ ⅔ on the first two sections.

I can’t say it enough: don’t wait for everyone to have it perfect before you add the next section. You have to allow for things to be imperfect in this process; imperfection is a natural step in learning. Aim for ⅔ ⅔ and then add on.

4. Show sticking.

Once you’ve introduced all sections and hit ⅔ ⅔ on the full phrase, teach the sticking. Either turn your back to students when you do this or mirror the sticking if you’re facing them (i.e., use your left hand for right hand hits) so highly visual learners don’t get confused.

Change to a count of “ichi ni so-re” to start rather than First me/Now you. It prepares students for the next step.

As you did with the echoing, go over the sticking for one section several times. Add on the next section when you hit ⅔ ⅔. Keep that up until you’ve taught all of the sticking.

5. Build the phrase by sections on the drums.

Have students go to their taiko. Add the jiuchi. Build up the full phrase by sections, as you did with the echo teaching and sticking. Count in by “ichi ni so-re.” Add a new section when you hit ⅔ ⅔. In the video, the class is working on sections 1 and 2.


If you follow these steps, by the time you’ve built up the whole pattern on the drums, students have said, played, or air-bachied (that’s a word, look it up) the phrase 30-50 times. This is enough repetition for many students to have memorized it. Note, we don’t touch drums until Step 5.

This method is harder for visual learners. For this reason, I encourage students to write down what they’ve learned when we take a break and check it with me to make sure they’ve got it right. I don’t let them read from this paper as we play, however. Visual learners CAN succeed with this method, it just takes a little more time and a little more support from the teacher during breaks.

If you use this method, let me know. I’d love to hear how it works for you. Happy teaching!


Basic Beats: Three drills for beginners

When players are first starting out, they need drills with simple patterns. The video on the right features three drills I created to help students practice basic beats (don, doko, ka, kara, tsu, and tsuku). These drills work for both kids and adults.

It’s important to get people vocalizing from the get-go, to prepare them for kiai later on. I also like to get people playing both right and left hand lead from the very first class.

The drills are written out here (in kuchishoka and western notation, thanks once again to Kristin). I don’t recommend giving written materials to students before introducing a drill or song, because it reinforces learning through intellect rather than learning through experience. But giving written materials AFTER introducing a drill or song is great! It helps students practice patterns correctly and can be critical to the success of your visual learners.

Happy teaching!

P.S. A shout out to my current community class students, who are demonstrating the drills in the video!


If you fail to plan.…

pic for lesson planning post.jpg

Planning your lessons in advance takes time, but it’s time well spent. It’s the difference between mediocre classes and students liking taiko more than recess. (TL;DR? Here’s a template you can use, and see you next post.)

There are lots of different ways to approach planning lessons. Here are two tips I’ve found helpful over the years.

  1. Plan your objective first.

You need to have a clear idea of what you want your students to understand or be able to do at the end of your class. Is this session about kuchishoka? Form? Learning a song? Building fundamentals for soloing? It doesn’t have to be just one thing, but it needs to be spelled out clearly. Begin with “By the end of this class, students will…” and then complete the sentence. (You can leave out the “by the end of this class” if it feels too wordy - I usually do).

2. Keep your students active.

When I was teaching in Japan, I was introduced to this format for lesson planning. I loved it, and still turn to it today. (Here’s an example of a lesson I planned using this format. Both “teacher” and “teaching artist” refer to the instructor leading the class.)

Try using this format to plan your next class. If you see a lot of “listening” or “watching” and fewer active verbs (i.e., drumming, chanting, moving, etc.) change up the lesson so students are more active.

A general rule of thumb: for K-1 students, you need to change activities at least every 5 minutes, or even more frequently. For 2nd and 3rd graders, change every 7 (ish) minutes; for 4th-5th graders, change every 10-15 minutes. Gr. 6 and up can easily spend 45 minutes and more on an activity, as long as they’re actively involved in their learning.

This means you have to have a lot of activities ready for lower grades and that it will take you several classes in a row to complete an extended activity. This is a great approach! It gives students a week to absorb information and experiences before moving on to more complex steps, which greatly increases success.

If you have any questions about a specific lesson you’re working on, feel free to email me. Happy teaching!